Thursday, July 12, 2012

Absence makes the heart grow fonder...hopefully...

Hi folks.  Just letting you know I probably will be absent for a few days from the blog world.  Hopefully this means that I will be back soon with some amazingly exciting news to share with you.  Please be patient with me.  I'll be back wicked soon, and hope you don't forget about me while I'm gone.  Oh, and because I know people (I) don't like to read blog posts with no pictures, here's one of Jessica Biel as the hottest farmer you'll ever see, just because...
farmer


Thanks for stopping by,
-Lindsey

Tuesday, July 10, 2012

My Summer hairstyle...

simple braidThere's not much else in the World that I find more irritating than having my bangs plastered to my forehead on a hot Summer day.  So THANK YOU, Michelle Williams for rocking this hairstyle, and validating that a grown woman is allowed to walk around in a toddler's "do" to keep from having bangs-rage, getting out her husband's clippers, and G-I-Jane-ing her head...

So I've been sporting the front twist to keep my shaggy Bieber bangs off my forehead, and so far it's working just dandy.

It's all for the greater good though.  If I suffer through the Summer months, then I'll be well on my way to having my Jennifer Aniston hair back... er, having hair long enough that I can pretend it looks like JA's when I stand in front of the mirror without my glasses on...

this hairstyle...
You know what Jennifer Anison is saying in this photo?  She's saying, "Please God, give me the strength to keep from murdering someone (possibly my hair stylist) if it gets humid today and these bangs touch my forehead."


Thanks for stopping by,
-Lindsey

Monday, July 9, 2012

Mini-Studio make-over...

On Friday I told you all about a project I was planning on knocking out over the weekend, and promised you progress pics.  Well, Folks, when I decide to make changes in my house, I don't mess around.  That stuff doesn't just get progress made, it gets DONE.  Why am I gloating so much about this?  Oh, I don't know, maybe because I did it for FREE (!!!).  That's right, zilch, nada, zero dollars involved in this fine make-over.  **This is me right now doing one of those fine 90's-era uber-dork fist pumps in the air, accompanied by the classy bottom-lip-bite** because I feel as though this accomplishment warrants such an extreme gesture**

Ta-da!

A place for everything...
...And everything in it's place 
Allow me to remind you of the Before
And After (sigh...)
I'm a tiny bit excited about this...

You may notice, however, that I'm missing my swell seating option from Friday's inspiration board.  I had a stool already that could have been repurposed for this space if it weren't completely dwarfed by the height of my new work surface.  I made the counter space ridiculously tall on purpose, because I like to stand up to work, and often find myself in horrid posture, hunched over my projects.  There are times, however (like when putting on the teeny-tiny labels that take forever to deal with) that I like the option of sitting down.  Unfortunately my new Godzilla-tall counter is going to make finding a seating option a bit more tricky.  The hunt begins... 

OK, so here's what I used to turn a closet into a mini-studio space:  
~Every bit of the wood I used for the shelving was salvaged from a section of a shed we tore down in our backyard last Summer.
~The vintage lamp was a thrift find many years ago that my husband rewired for me, and had been sitting in storage in my basement ever since because I didn't have my own big-girl space to put it.
~The picture of the lady was something I bought for myself back when I got my very first apartment, and has traveled with me all these years to finally find a home on the wall of my new "studio."  I've promised her a proper frame soon.
~The counter top is made from a section of wood we found at Lowes back when we first bought our house with the intention of actually using it as a counter top in our hasn't-happened-yet-and-probably-won't-for-a-good-long-time kitchen remodel, then got turned into a computer desk for a brief period of time, then got sent to the basement after being replaced by a new desk top (coincidentally another slab of counter top).
~I had already been storing most of my finished products in recycled berry baskets.  It makes them really easy to take with me and display at the farmers' market.  So I just kept them in there because they fit perfectly on the shelves.  
~The colorful baskets (made from recycled magazines) that are now holding some of my packaging supplies used to live in my closet in our master bedroom.  But since we recently turned my closet into a bathroom, and I moved all my stuff into my husband's closet, there wasn't enough room for all my baskets of goodies, and things had to be consolidated.  So, like most of the other stuff in our house, they had been banished to our basement waiting to be put to use again.
~And the white paint doesn't owe us a dime.  It's Local Color paint we purchased years ago, and have used all over the house on various projects prior to this one.   


Thanks for stopping by,
-Lindsey

Friday, July 6, 2012

Studio space inspiration...

Perfumer Anne McClain   Photograph by Lianna Tarantin
Perfumer Anne McClain Photograph by Lianna Tarantin
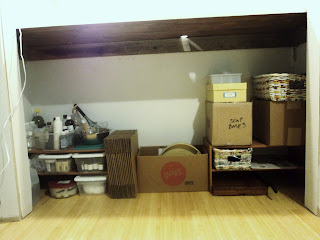
Her work space is my inspiration for my new "studio."  Simple, functional, and clean.  My favorites.  She, however, has a massive space in comparison to the one I'll have to work with.  Basically the only "room" in my entire house that can be freed up to be turned into my "studio" is the closet in our office (now you see why studio was in quotes?).  But since I've been starting to do OK at this whole lotion, soap, and now perfumery thing, it would be really swell to have a space other than the kitchen counter that I can use to create my goodies.  Especially since my husband is a cook, and would greatly appreciate having his kitchen back for the preparation of actual edible creations.  Even if it's just a tiny closet-turned-studio space, it'll be mine, and it'll be fantastic to have my work space and supplies all in one space.  This it what it looks like currently, in it's Before state...
It's currently my storage place for fabric scraps and sewing supplies (hence the creepy mannequins on the right), as well as all of my Ecolosophy stuff, which has (shamefully, since I pride myself on my OCD organizational skills) spilled out onto the floor now that I'm making weekly treks to the Farmers' Market and need to schlep my stuff back and forth (and don't always feel like unpacking it all when I get home).
Things I feel are essential for a happy work space:
~Shelving that's both functional and interesting to look at.
~A place to organize and streamline all my packaging.  Eastfield Village (pictured below in #2), totally has theirs right, as far as I'm concerned.
~Easy-to-clean work surface that's at a height I'm comfy standing in front of
~A place to sit in case I get sick of standing
~Nifty lighting
~Something entertaining to look at
My studio space inspiration board
1, 2, 3, 4, 5, 6.  

Wish me luck.  I'll be starting on it this afternoon.  Progress pictures to follow on Monday.


Thanks for stopping by and have a great weekend,
-Lindsey


Thursday, July 5, 2012

Amazingly simple Pea Trellis...

Well, kind of.  The hard part was finding the guy who did this.  I say that, because without this particular guy,   these exact project materials wouldn't have been obtainable, and therefore the same results wouldn't have been achieved.  So first off, you'll need to go out and find yourself a Chef who really likes to grow his own food, but he also has to have formerly been a Marine so that he comes with really cool supplies (like parachute cord).  Then one day in the Spring time, you need to happen upon his dream-garden-seed-packet-list, steal it, go buy everything on it.
What our garden looked like about a month ago
OK, so if you've found a wicked cute guy with cool toys, and you've bought him a whole boatload of seeds, then you just sit back and wait.  You wait for the day that you come outside and see something that looks like a whole bunch of trees fell apart and left their pieces-parts in your raised beds, but then upon closer inspection you see that they are none other than artfully crafted Pea Trellises.  Materials required for this project?  Sticks and parachute cord (wildly cute husband is optional, as you could easily make this yourself, but I highly recommend keeping one around).  See, wicked simple, huh.  And for those of you who married wicked cute guys with other previous professions that didn't supply them with super-strength cord to keep life-saving devices from falling apart, plain old string from the hardware store will work just fine.

Basically, you just make 2 big "A's" out of sticks, bind them together at the top with your cord/string, attach them together by laying another stick across the top between them, wind the string again around the top piece to secure it, then tie a bunch of long pieces a few inches apart on the top piece, and let the loose ends dangle into the Pea plants.  They'll do the rest of the work from there.  Fancy, huh?

Peas, happily grasping a hold of and climbing up the cord 
What it looks like from the front.  Sorry about all the other sticks and stakes in the photo confusing things for us, but the tomato plants are growing like mad, and are going to be tied to the stakes this afternoon.  No one wants floppy tomatoes...

Thanks for stopping by,
-Lindsey


Tuesday, July 3, 2012

The couple that kills together, stays together...


Once upon a time this blog was about my journey into chicken farming.  Although I have continued that journey, I have failed miserably at documenting most of it.  And by "most of it" I mean that the last picture you guys saw of my meat birds was about 6 weeks ago when they were just coming into their adolescent dino-baby ugliness, and yesterday was their slaughter day.  Whoopsie.  But this I have to tell you about, especially if you started reading my blog because you were hoping to gain some insight into raising chickens, and have (thank you) hung on through all of my rambles about lipstick shades and paddleboarding.  

Now, most people send their animals away to be slaughtered.  The standard practice is to load as many chickens as possible into a dog crate, put the crate in your car, tell them they're going to a newer, happier farm, drop them off, walk away, and come back in a few days to pick up your perfectly packaged dinner items.  This is fantastic because it keeps you close to the process while you raise them, but then lets someone else do the dirty work of looking into their eyes at the end.  Oh, but not us.  No way.  We have to be the 2 cheapest, most stubbornly independent DIY-ers the world has ever seen.  So Hubby and I figured that we had what it took to take this on.  With his experience as a chef, and one of his intern places having an up-scale butchering operation in-house, my experience being Annie Oakley against a backyard varmint (or 3), and both of us having watched every single episode of Dexter, we figured we would be pretty OK at it.  
We actually weren't wrong which, for the sake of humane treatment of our chickens, was pretty awesome.  For the sake of still thinking we were even a tiny bit "normal," well, that went sailing out the window yesterday.  If you want to have the weirdest day EVER with your husband, set up the following series of events for the day... Watch the YouTube video about slaughtering chickens for the 3rd time just to make sure you've really got it all, set up a "kill room" in your back yard, both of you wear matching (white!) outfits (in our defense, my husband has about a thousand chef coats and aprons kicking around, and they made really great disposable suits that were also perfect for keeping some of the beating sun off our backs), then take turns being the "holder" or the "cutter."

I learned 6 things yesterday that I will share with you if you think you might want to consider slaughtering your own farm animals.
1.  Killing something with a knife is harder than killing something with a gun.  Not harder physically, harder psychologically.  
2.  8 birds was the absolute maximum amount I would want to do by ourselves.  Next year we're planning on getting more birds than we did this year, and after yesterday's reality check, are seriously considering having someone else slaughter them for us.
3.  I totally married the right guy.  I mean, of course I new that before yesterday.  I'm just saying that yesterday's events were really bizarre, and even though taking turns killing things is not a date a ever want to go on again, if I had to, it would be this exact guy that I'd want to have next to me.
4.  I'm really glad we didn't name the meat birds.  So was my husband.  I know this because he actually said so mid-slice on one of the first ones we did.  I've already told him that we're either sending the egg birds away when it's their time in a couple years, or he's doing them himself.  I already know I'll cry.
5.  I'm also really glad we did a lot of research on the most humane ways to get the job done.  None of it felt "nice," but it did feel better knowing that we chose the method that would cause the least amount of suffering (which also benefited us, because it causes the least amount of damage to the meat when the animal is relaxed through the process).  If you're wondering, we used the method from the YouTube video I linked to above.
6.  I still wholeheartedly love Dexter, and can't wait until this Fall when Season 7 starts.


Thanks for stopping by,
-Lindsey